Let's Chat!
Any questions? Contact us by filling out the form below and we will respond within 24 hours.
Any questions? Contact us by filling out the form below and we will respond within 24 hours.
Note: This tutorial is based on documentation provided by Jira on how to import CSV files to a Jira project. For more information reference that document here. Scroll down to the section titled "Importing your CSV File"
Step 1: Within a Gradient project, open the options menu at the top of the issues list and select “Export Issues as CSV”:

This will send a CSV file of all issues in the project to your email.
Step 2: In Jira, expand the left side menu and select “Jira Settings”, then “System” and then “External System Import”, as show below. You may need administrative privileges to access the System Settings menu.


Step 3: Select the CSV import option.

Step 4: Upload the CSV file that was exported from Gradient and click Next.

Step 5: Choose the destination project for the Gradient issues, and enter the email domain for any new users that will be created from the import. The Date Format field should not need to be modified.

Step 6: Next, map fields in the CSV to the appropriate fields in Jira. This will be dependent on your exact Jira configuration. You will need to manually “Map Field Value” for the assignee and created_by fields, as usernames in Gradient likely will not line up with Jira. To do this, select the check boxes highlighted below.

Step 7: Here, you’ll need to enter the jira handle of the associated user in the “Target value in Jira” field. A quick way to determine the handle of a certain user in Jira is to open an issue and begin to type their name in the assignee field.
I contacted Jira support to determine if there was an easier way to view all user’s handles - unfortunately I received the following response:
“We are in the process of changing how Jira handles these mentions, so you can't easily verify them”

Step 8: Next, map the Gradient statuses to Jira statuses.
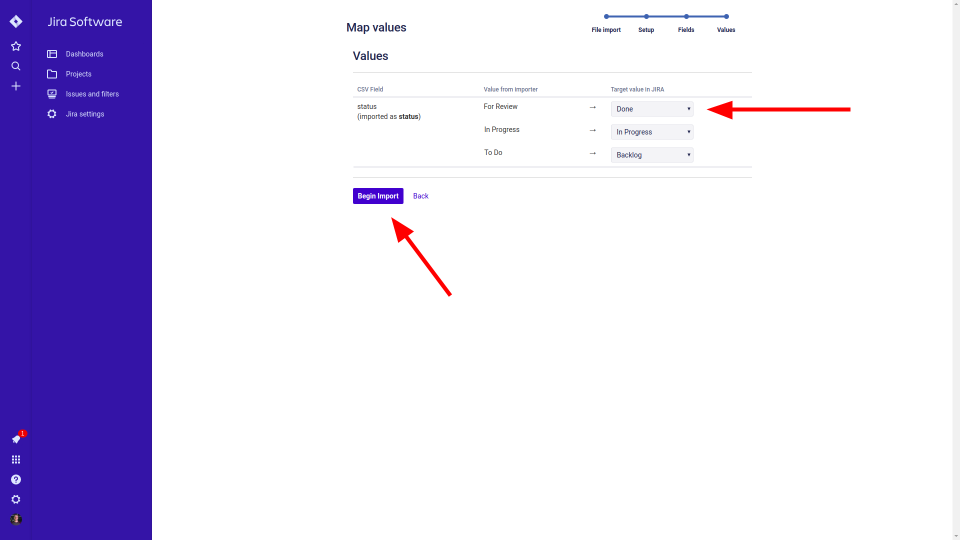
Step 9: Finally, click Begin Import to import all the issues to the Jira project.

.svg)
